- Visit CakePHP website
- Download the CakePHP Framework
- You must have setup a local webserver. If not, install Zend Server Community Edition and MySQL. Download Zend server and install it. If you are not installing MySQL as separate installation you can choose it with Zend server installation also. You can install it separately, do this as you wish.
- Create a database called “cakephp”.
- Go to Zend Server web root it will be “C:\Program Files\Zend\Apache2\htdocs”.
- Extract CakePHP Framework to your web root and re name with the version (Eg. cake_1_3 or cakephp, here I used cakephp).
Your CakePHP project folder Structure will be as follows,
/cakephp- /app
- /cake
- /vendors
- /.htaccess
- /index.php
- /README
- Open database.php on the cakephp app/config directory, and set host, login, password and save the work.
- Open core.php on the same directory and change Security.salt and Security.cipherSeed values for different (for tests, simply put additional character at the end).
- Now open “C:\Windows\System32\drivers\etc\hosts” file in a notepad and add following at the end,
127.0.0.2 cakephp - Open Apache2 configuration file (httpd.conf) at “C:\Program Files\Zend\Apache2\conf” and add the following virtual host.
<VirtualHost 127.0.0.2>
ServerName cakephp
DocumentRoot “C:\Program Files\Zend\Apache2\htdocs\cakephp\app\webroot”
<Directory “C:\Program Files\Zend\Apache2\htdocs\cakephp\app\webroot”>
AllowOverride all
Options All
</Directory>
</VirtualHost> - Copy “cake” folder from your cakephp folder and paste it in “C:\Program Files\Zend\ZendServer\share”.
- Open Environmental Variables and change the “path” and add “C:\Program Files\Zend\ZendServer\share\cake\console” at the end of the paths.
- Save all changes and RESTART windows.
- Access http://cakephp on your browser. It should work.
- Now start developing, app folder is the folder you need to work.
- Open Command Prompt and change the directory to your cake app drirectory, use following
cd C:\Program Files\Zend\Apache2\htdocs\cakephp\app - Press Enter and enter command cake
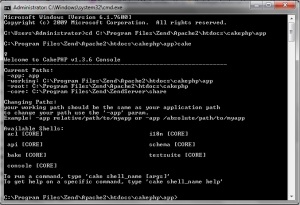
- You should get as follows,

- Now you can bake your cake..
Copyright (c) 2009 Microsoft Corporation. All rights reserved.C:\Users\Administrator>cd C:\Program Files\Zend\Apache2\htdocs\cakephp\appC:\Program Files\Zend\Apache2\htdocs\cakephp\app>cake
♀
Welcome to CakePHP v1.3.6 Console
—————————————————————
Current Paths:
-app: app
-working: C:\Program Files\Zend\Apache2\htdocs\cakephp\app
-root: C:\Program Files\Zend\Apache2\htdocs\cakephp
-core: C:\Program Files\Zend\ZendServer\share
Changing Paths:
your working path should be the same as your application path
to change your path use the ‘-app’ param.
Example: -app relative/path/to/myapp or -app /absolute/path/to/myapp
Available Shells:
acl [CORE] i18n [CORE]
api [CORE] schema [CORE]
bake [CORE] testsuite [CORE]
console [CORE]
To run a command, type ‘cake shell_name [args]’
To get help on a specific command, type ‘cake shell_name help’
C:\Program Files\Zend\Apache2\htdocs\cakephp\app>
